
Changing a shirt color in AI is easy. Changing it without the collar warping, the stitching drifting or the folds turning into a different garment is the hard part. A seam lock prompt solves that by telling the AI to keep the garment’s structure fixed and change only the color or the fabric.
The 13 prompts below cover the layouts people actually use for this edit: color grids, before and after strips, fabric comparisons, swatch boards and style guides. Each one also locks the person’s face and identity, so you get the same person in a new outfit.
Quick Answer: What Is a Seam Lock Prompt?
A seam lock prompt asks the AI to preserve every stitch line, hem, pocket edge, collar shape, fold and drape of the original clothing. Only the surface changes: the color, the material or both. Think of it as a re-dye or a re-weave, not a new outfit.
How to Use These Prompts
- Upload a clear, well-lit photo where the clothing is fully visible.
- Paste one prompt as it is. Each already asks the AI to use your attached photo.
- Swap the color or fabric names for the ones you want.
- If the result drifts, send a follow-up: “Keep the seams, folds and fit exactly as in the original and only adjust the fabric.”
Tip: These work in ChatGPT image editing, Gemini and Nano Banana, though results vary by tool and version. Ask for 1:1 for grids, 4:5 for portraits and 16:9 for side-by-side layouts.
Color Grid Prompts
Same pose, same crop, many colors. The difference is visible at a glance, which makes these the most shareable results.
1. Nine-Color T-Shirt Portrait Grid
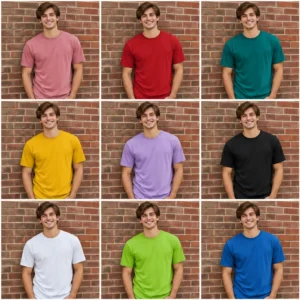
One photo becomes nine colorways. The key is forcing the same pose and crop in every frame.
Treat the attached photo as the identity source: the face, skin tone and every facial detail must stay exactly as they appear, with nothing reshaped or retouched.
Create a clean 3×3 grid of nine identical portrait frames with the same pose, the same crop and the same red brick wall behind him. Only the t-shirt color changes: dusty pink, tomato red, teal, mustard yellow, lilac, black, white, lime green and royal blue. Lock the neckline, sleeve hems, side seams and every fabric fold so the shirt shape is identical in all nine panels. Thin white gutters, soft daylight, ultra HD sharpness, natural skin texture.
Best for: Instagram carousels and color palette showcases.
2. Six Hoodie Colors Studio Grid
 Guru Purnima AI Photo Editing Prompt 2026
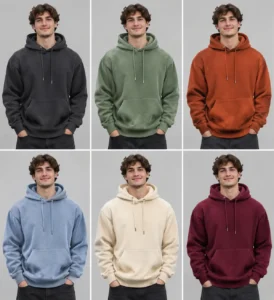
Keep the person in the attached image completely unchanged in face and identity, with no restyling of his features, hair or expression.
Make a 2×3 grid showing the same hoodie in six colors: charcoal, sage green, rust orange, powder blue, cream and burgundy. Same pose and same framing in every panel. Lock the hood seam, drawstrings, kangaroo pocket stitching, ribbed cuffs and every crease. Keep the brushed fleece texture visible. Plain light-grey studio background, even soft lighting, crisp 4K detail.
Best for: Streetwear and merch-style previews.
3. Three Coats, One Urban Style
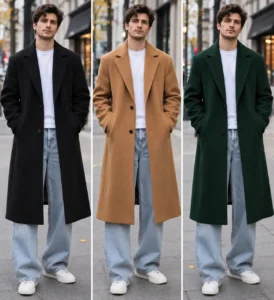
Anchor to the attached reference for identity: the face, facial structure and expression must look completely unchanged in all three panels.
Create a vertical-style triptych of three full-body panels of the same man in the same standing pose, hands in pockets. Panel one: the long coat in black. Panel two: the same coat in camel. Panel three: the same coat in bottle green. The white tee and loose light-wash jeans stay as they are. Keep collar, pocket seams, hem and drape identical in each panel. Blurred city street behind him, soft overcast light, sharp premium fashion look.
Best for: Seasonal outfit planning and lookbooks.
4. Four Festive Kurta Looks in Warm Light
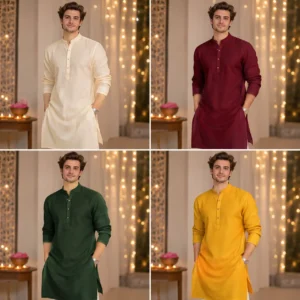

Use the attached photo and hold the man’s face and identity fixed. Nothing about how he looks should shift between panels.
Build a 2×2 grid of the same kurta in four colors: ivory, deep maroon, forest green and mustard yellow. Same pose and framing in every panel. Lock the collar band, placket buttons, side slits, sleeve hems and the exact fall of the fabric. Warm festive bokeh of fairy lights behind him, soft golden light, ultra sharp, fine cotton-silk texture.
Best for: Diwali, Eid and wedding-season outfit previews.
Before and After Prompts
Small labels, matching panels and one clear change.
5. Before and After Shirt Color Comparison
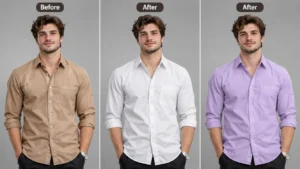
Using the attached image, the man’s face and identity are fixed. Do not alter his features, hairstyle or expression in any panel.
Make a horizontal three-panel strip with small “Before”, “After” and “After” labels at the top. Panel one is the original tan shirt. Panel two recolors it to crisp white. Panel three recolors it to soft lavender. Keep the collar, placket, cuff stitching, chest wrinkles and sleeve folds consistent across all panels. Neutral studio background, even lighting, sharp 4K detail, realistic cotton weave.
Best for: Clothes color changer demos and product-style previews.
6. Before and After: Black to Burgundy Dress
 5 Best viral Lofi Dusk Prompts for girl and boy
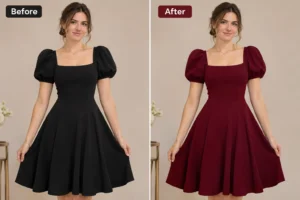
Work from the attached photo and leave the woman’s face, features and identity completely untouched.
Create a two-panel before and after image with small “Before” and “After” tags. The left panel is the original black puff-sleeve dress. The right panel is the same dress in rich burgundy wine. Preserve the stitching, square neckline, waist seam, puff sleeves, hem and the exact drape of the skirt. Keep the original fold shadows so the color looks dyed, not painted. Same pose, hair and soft beige background in both panels, sharp 4K clarity.
Best for: Evening wear and festive photos.
7. Casual Denim vs Formal Suit
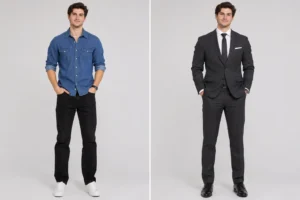
The man in the attached photo stays exactly himself: identical face, identical features and no change to his appearance.
Make a two-panel image with the same standing pose. Left panel: the original blue denim shirt and black jeans. Right panel: the same body in a charcoal two-piece suit with a crisp white shirt and dark tie. Keep shoulder width, sleeve length, trouser break and posture identical in both panels. Plain light-grey studio backdrop, even lighting, razor-sharp 4K quality.
Best for: Interview outfit previews and style transformations.
8. Urban Coat Color Comparison
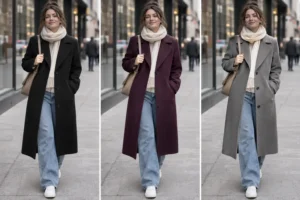
This must remain the same woman as in the attached photo, with an identical face and no alteration to her appearance in any panel.
Create a three-panel side-by-side from the same city street scene and the same walking pose. Panel one: the long coat in black. Panel two: the coat in plum. Panel three: the coat in stone grey. Keep the cream scarf, light-wash jeans, sneakers and background unchanged. Coat seams, collar, buttons and hem stay locked. Soft overcast light, editorial street-style finish.
Best for: Autumn and winter outfit inspiration.
Fabric Swap Prompts
The shape stays the same and the material changes. Describe how light behaves on the new fabric so it looks real instead of pasted on.
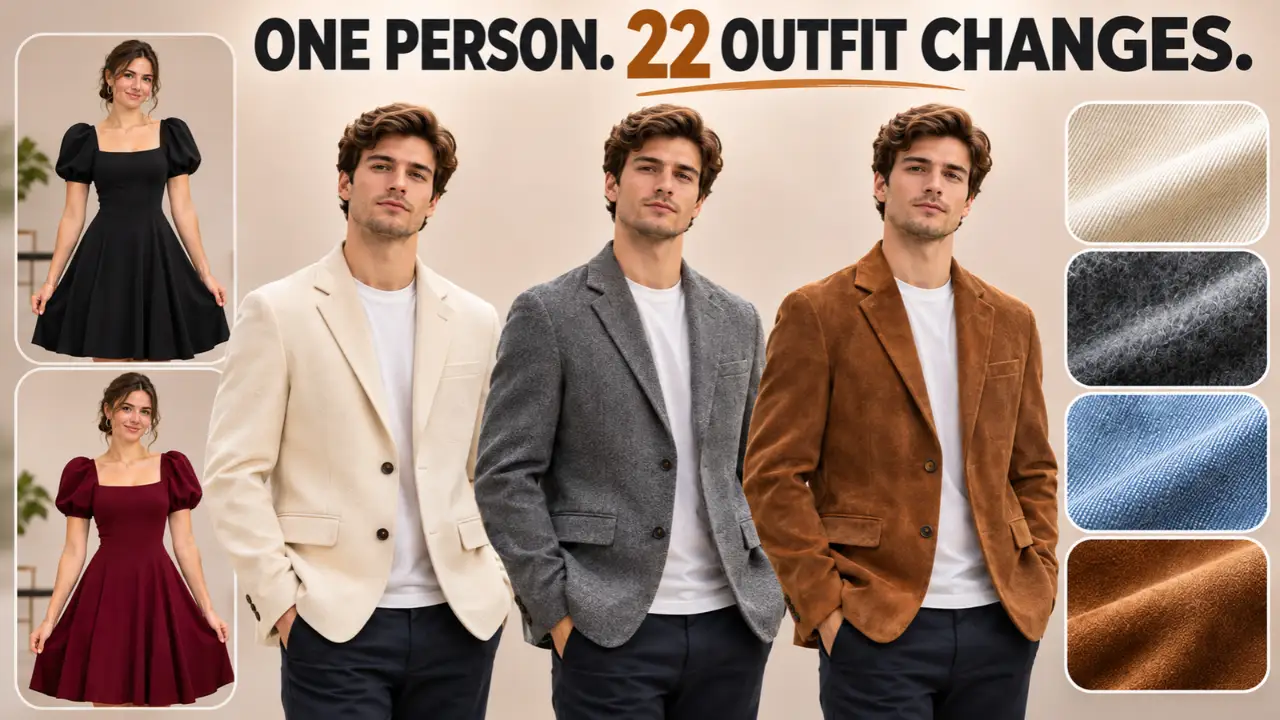
9. Four Blazer Textures Compared
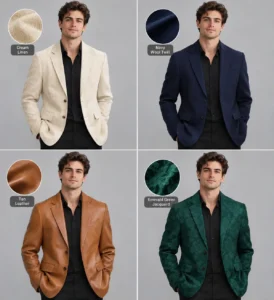
The clearest way to show a fabric swap: identical garment structure in four materials.
Hold the person in the attached photograph exactly as he is: same face, same identity, no cosmetic changes whatsoever.
Create a 2×2 grid of the same blazer on the same man in the same pose. Top left: cream linen. Top right: navy wool twill. Bottom left: tan smooth leather. Bottom right: emerald green jacquard with a subtle floral pattern. Seam lock the lapels, buttons, pocket flaps, shoulder line and sleeve length across all four. Add a tiny round fabric swatch in each corner. Light-grey studio background, soft box lighting, premium editorial quality.
Best for: Fashion mood boards and fabric comparison posts.
10. Four Fabrics, One Timeless Style
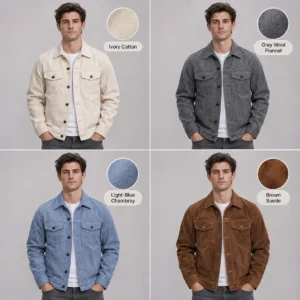
Stay faithful to the attached reference: same face, same facial details, same person, with zero alteration.
Create a 2×2 grid of the same jacket on the same man in the same pose. Versions: ivory cotton, grey wool flannel, light-blue chambray and brown suede. Lock the collar, button positions, chest pockets, sleeve length and stitching in all four. Add a small round swatch with a short label in each panel. Clean studio backdrop, soft even light, sharp macro-level fabric texture.
Best for: Product mockups and fabric previews.
Swatch Board and Style Guide Prompts
Designer-style layouts: the outfit next to fabric swatches, callouts or labels.
11. Sand Jacket and Fabric Swatches
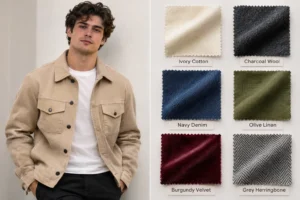
Keep the face from the attached reference completely unchanged, including the same features, the same likeness and the same expression.
Design a split layout. On the left, the man wearing the original outfit with the jacket recolored to sand beige over a white tee. On the right, a neat board of six square fabric swatches: light grey, charcoal wool, navy denim, olive linen, burgundy velvet and grey herringbone, each with a small clean label. The jacket seams, buttons, chest pockets and folds stay locked to the original. Soft overhead light, sharp macro detail on the swatches, minimal modern layout.
Best for: Fashion bloggers and outfit planning posts.
12. Emerald Shirt Fabric Guide
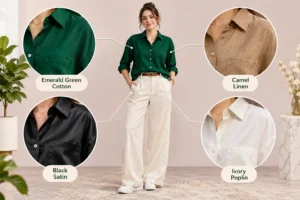
A center portrait surrounded by round callouts showing fabric close-ups.
Using the attached photo, the woman’s face, hairstyle and identity must remain exactly the same as the original.
Create a clean collage with the full-body portrait in the center, wearing an emerald green shirt with cream wide-leg trousers. Place four circular callouts around her. Each circle shows a close-up of the same shirt in a different fabric: emerald green cotton, camel linen, black satin and ivory poplin, each with a short label. Keep the shirt seams, buttons and drape consistent in the center image and the callouts. Soft blush-pink background, tidy spacing, sharp ultra HD detail.
Best for: Fashion carousels and style guides.
13. Cream Blazer Style Guide
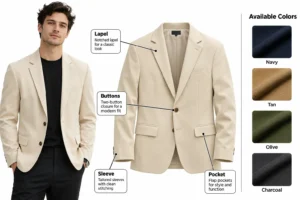
Reference the attached image, and keep the model’s face and identity identical in the final layout.
Turn the photo into a clean style-guide layout. Show the man in the cream blazer and black tee on the left, and the blazer laid flat on the right with thin labeled lines pointing to the lapel, buttons, sleeve and pocket. Add an “Available Colours” column with four square swatches: navy, tan, olive and charcoal. The blazer’s structure, stitching and folds stay unchanged. White background, crisp lines, soft shadows, high-resolution catalog quality.
Best for: Fashion education posts and product guides.
Customization Tips
- Name the parts to lock: collar, cuffs, pocket flaps, hem, placket and pleats work better than “keep the clothes the same”.
- Be specific about color: “deep emerald” or “dusty rose” is more reliable than “green” or “pink”.
- Keep the old shadows: asking to preserve fold shadows makes the new color look dyed, not painted.
- For grids, say “same pose, same crop”: otherwise the AI may change the pose in each panel.
- Reduce panels if drift appears: a 3×3 grid can fail where a 2×2 works.
- Use a sharp source photo: blur in the original usually carries into the result.
Common Mistakes
- Describing a whole new outfit instead of a re-dye. The AI then redesigns the garment.
- Skipping the face-lock line, which can let faces shift during edits.
- Choosing a fabric that cannot hold the original shape, such as a structured blazer in thin chiffon.
- Stacking color, fabric, background and pose changes in one prompt.
FAQ
What does seam lock mean in an AI prompt?
It tells the AI to keep stitching, edges, folds and fit where they are, so only the color or material changes.
Will the face stay exactly the same?
The face-lock line improves your chances, but results depend on the tool and the photo. Check the face after each edit and retry if needed.
Which tool should I use?
Any image editor that accepts a reference photo can work, including ChatGPT, Gemini and Nano Banana. Output quality varies by tool and version.
Why do the folds change after the swap?
Usually the prompt did not mention folds, or the new fabric behaves very differently. Add “keep every fold and wrinkle in the same place” and pick a fabric of similar weight.
Can I change the colors in the grids?
Yes. Replace the color names with your own, and keep the “same pose, same crop” wording so every panel matches.

Hi, I’m Deepak Verma. I run MKEdit because I got a little obsessed with how good AI photo prompts can look when they’re written properly and paired with the right AI tools to generate high-quality images. Everything you see here, I’ve generated and tested myself first. If it’s on the site, it’s because it actually gave a good result — not just a random idea I typed once